ELMAH (Error Logging Modules and Handlers) is an application-wide error
logging facility that is completely pluggable. It can be dynamically
added to a running ASP.NET web application, or even all ASP.NET web applications on a machine, without any need for re-compilation or re-deployment.
We can implement Elmah in our SharePoint application. Following are the steps to implement elmah in SharePoint application -
1. Download ELMAH 1.2 Service Pack (SP) 2 from below link
http://code.google.com/p/elmah/wiki/Downloads
2. Download Setups for 64-bit Windows (.NET Framework 4.0) - (sqlite-netFx40-binary-x64-2010-1.0.93.0.zip )
http://system.data.sqlite.org/index.html/doc/trunk/www/downloads.wiki
3. Create a database named ELMAH_customlogging into the Microsoft SQL Server
4. The ELMAH download includes a file named
5. Create a empty SharePoint solution and a reference of elmah.dll and system.data.sqlite.dll
6. Add a Visual webpart and write a code to throw an exception to check weather elmah logged that error or not.
7. Following are the config entries that needs to added in web.config of the web application
Add under configsection
<configSections>
<sectionGroup name="elmah">
<section name="security" requirePermission="false" type="Elmah.SecuritySectionHandler, Elmah" />
<section name="errorLog" requirePermission="false" type="Elmah.ErrorLogSectionHandler, Elmah" />
<section name="errorMail" requirePermission="false" type="Elmah.ErrorMailSectionHandler, Elmah" />
<section name="errorFilter" requirePermission="false" type="Elmah.ErrorFilterSectionHandler, Elmah" />
</sectionGroup>
</configSections>
Add connectionstring section
<connectionStrings>
<add name="elmah-express" connectionString="Data Source=[server name];Initial Catalog=[ELMAH_customlogging];User ID=testuser;Password=Welcome1;" />
</connectionStrings>
Add elmah section just below the connectionstring section
<elmah>
<security allowRemoteAccess="0" />
<errorLog type="Elmah.SqlErrorLog, Elmah" connectionStringName="elmah-express" />
</elmah>
Add handler and module entry in httphandlers and httpmodules section under system.web
<httpHandlers>
<add verb="POST,GET,HEAD" path="elmah.axd" type="Elmah.ErrorLogPageFactory, Elmah"/>
</httpHandlers>
<httpModules>
<add name="ErrorLog" type="Elmah.ErrorLogModule, Elmah"/>
</httpModules>
Add handler and module entry in handlers and modules section under system.webserver
<modules runAllManagedModulesForAllRequests="true">
<remove name="ErrorLog"/>
<add name="ErrorLog" type="Elmah.ErrorLogModule, Elmah" preCondition="managedHandler" />
<add name="ErrorFilter" type="Elmah.ErrorFilterModule, Elmah" preCondition="managedHandler" />
<add name="ErrorMail" type="Elmah.ErrorMailModule, Elmah" preCondition="managedHandler" />
<add name="ErrorTweet" type="Elmah.ErrorTweetModule, Elmah" preCondition="managedHandler" />
</modules>
<handlers>
<add name="Elmah" path="elmah.axd" verb="POST,GET,HEAD" type="Elmah.ErrorLogPageFactory, Elmah" preCondition="integratedMode" />
</handlers>
8. After adding config entries deployed the webpart and that webpart on the SharePoint page.
9. Open the SharePoint page which will throw the exception as we have added the exception in the webpart.
10. Now to check the error log open the elmah.axd
like
https://webapp/sites/sitename/elmah.axd
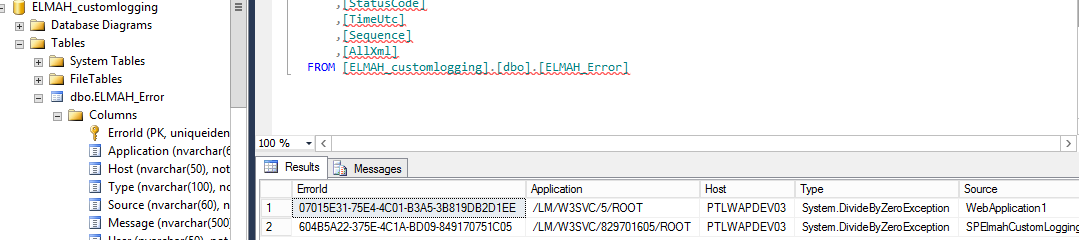
 11. SQL server view
Please refer below link for reference
http://www.codeproject.com/Articles/186237/Exception-logging-using-Elmah-Error-Logging-Module
We can implement Elmah in our SharePoint application. Following are the steps to implement elmah in SharePoint application -
1. Download ELMAH 1.2 Service Pack (SP) 2 from below link
http://code.google.com/p/elmah/wiki/Downloads
2. Download Setups for 64-bit Windows (.NET Framework 4.0) - (sqlite-netFx40-binary-x64-2010-1.0.93.0.zip )
http://system.data.sqlite.org/index.html/doc/trunk/www/downloads.wiki
3. Create a database named ELMAH_customlogging into the Microsoft SQL Server
4. The ELMAH download includes a file named
SQLServer.sql . Run this script against database that we have created in above steps. This script will create tables for ELMAH for error logging.5. Create a empty SharePoint solution and a reference of elmah.dll and system.data.sqlite.dll
6. Add a Visual webpart and write a code to throw an exception to check weather elmah logged that error or not.
7. Following are the config entries that needs to added in web.config of the web application
Add under configsection
<configSections>
<sectionGroup name="elmah">
<section name="security" requirePermission="false" type="Elmah.SecuritySectionHandler, Elmah" />
<section name="errorLog" requirePermission="false" type="Elmah.ErrorLogSectionHandler, Elmah" />
<section name="errorMail" requirePermission="false" type="Elmah.ErrorMailSectionHandler, Elmah" />
<section name="errorFilter" requirePermission="false" type="Elmah.ErrorFilterSectionHandler, Elmah" />
</sectionGroup>
</configSections>
Add connectionstring section
<connectionStrings>
<add name="elmah-express" connectionString="Data Source=[server name];Initial Catalog=[ELMAH_customlogging];User ID=testuser;Password=Welcome1;" />
</connectionStrings>
Add elmah section just below the connectionstring section
<elmah>
<security allowRemoteAccess="0" />
<errorLog type="Elmah.SqlErrorLog, Elmah" connectionStringName="elmah-express" />
</elmah>
Add handler and module entry in httphandlers and httpmodules section under system.web
<httpHandlers>
<add verb="POST,GET,HEAD" path="elmah.axd" type="Elmah.ErrorLogPageFactory, Elmah"/>
</httpHandlers>
<httpModules>
<add name="ErrorLog" type="Elmah.ErrorLogModule, Elmah"/>
</httpModules>
Add handler and module entry in handlers and modules section under system.webserver
<modules runAllManagedModulesForAllRequests="true">
<remove name="ErrorLog"/>
<add name="ErrorLog" type="Elmah.ErrorLogModule, Elmah" preCondition="managedHandler" />
<add name="ErrorFilter" type="Elmah.ErrorFilterModule, Elmah" preCondition="managedHandler" />
<add name="ErrorMail" type="Elmah.ErrorMailModule, Elmah" preCondition="managedHandler" />
<add name="ErrorTweet" type="Elmah.ErrorTweetModule, Elmah" preCondition="managedHandler" />
</modules>
<handlers>
<add name="Elmah" path="elmah.axd" verb="POST,GET,HEAD" type="Elmah.ErrorLogPageFactory, Elmah" preCondition="integratedMode" />
</handlers>
8. After adding config entries deployed the webpart and that webpart on the SharePoint page.
9. Open the SharePoint page which will throw the exception as we have added the exception in the webpart.
10. Now to check the error log open the elmah.axd
like
https://webapp/sites/sitename/elmah.axd
11. SQL server view Please refer below link for reference
http://www.codeproject.com/Articles/186237/Exception-logging-using-Elmah-Error-Logging-Module